User Guide
Understanding X/Y Position Calculator
X/Y Position Calculator is a tool designed to help cycling enthusiasts and professionals (fitters, coaches, mechanics) compare bike geometries and handlebar/saddle positions. Using X (horizontal) and Y (vertical) coordinates, you can precisely determine how to configure different bikes to match the desired position.
What are X and Y coordinates?
In the XY Bike Calc, we use a Cartesian coordinate system where:
- The X-axis represents horizontal distance
- The Y-axis represents vertical height
- The origin (0,0) is at the bottom bracket (BB) of the bike
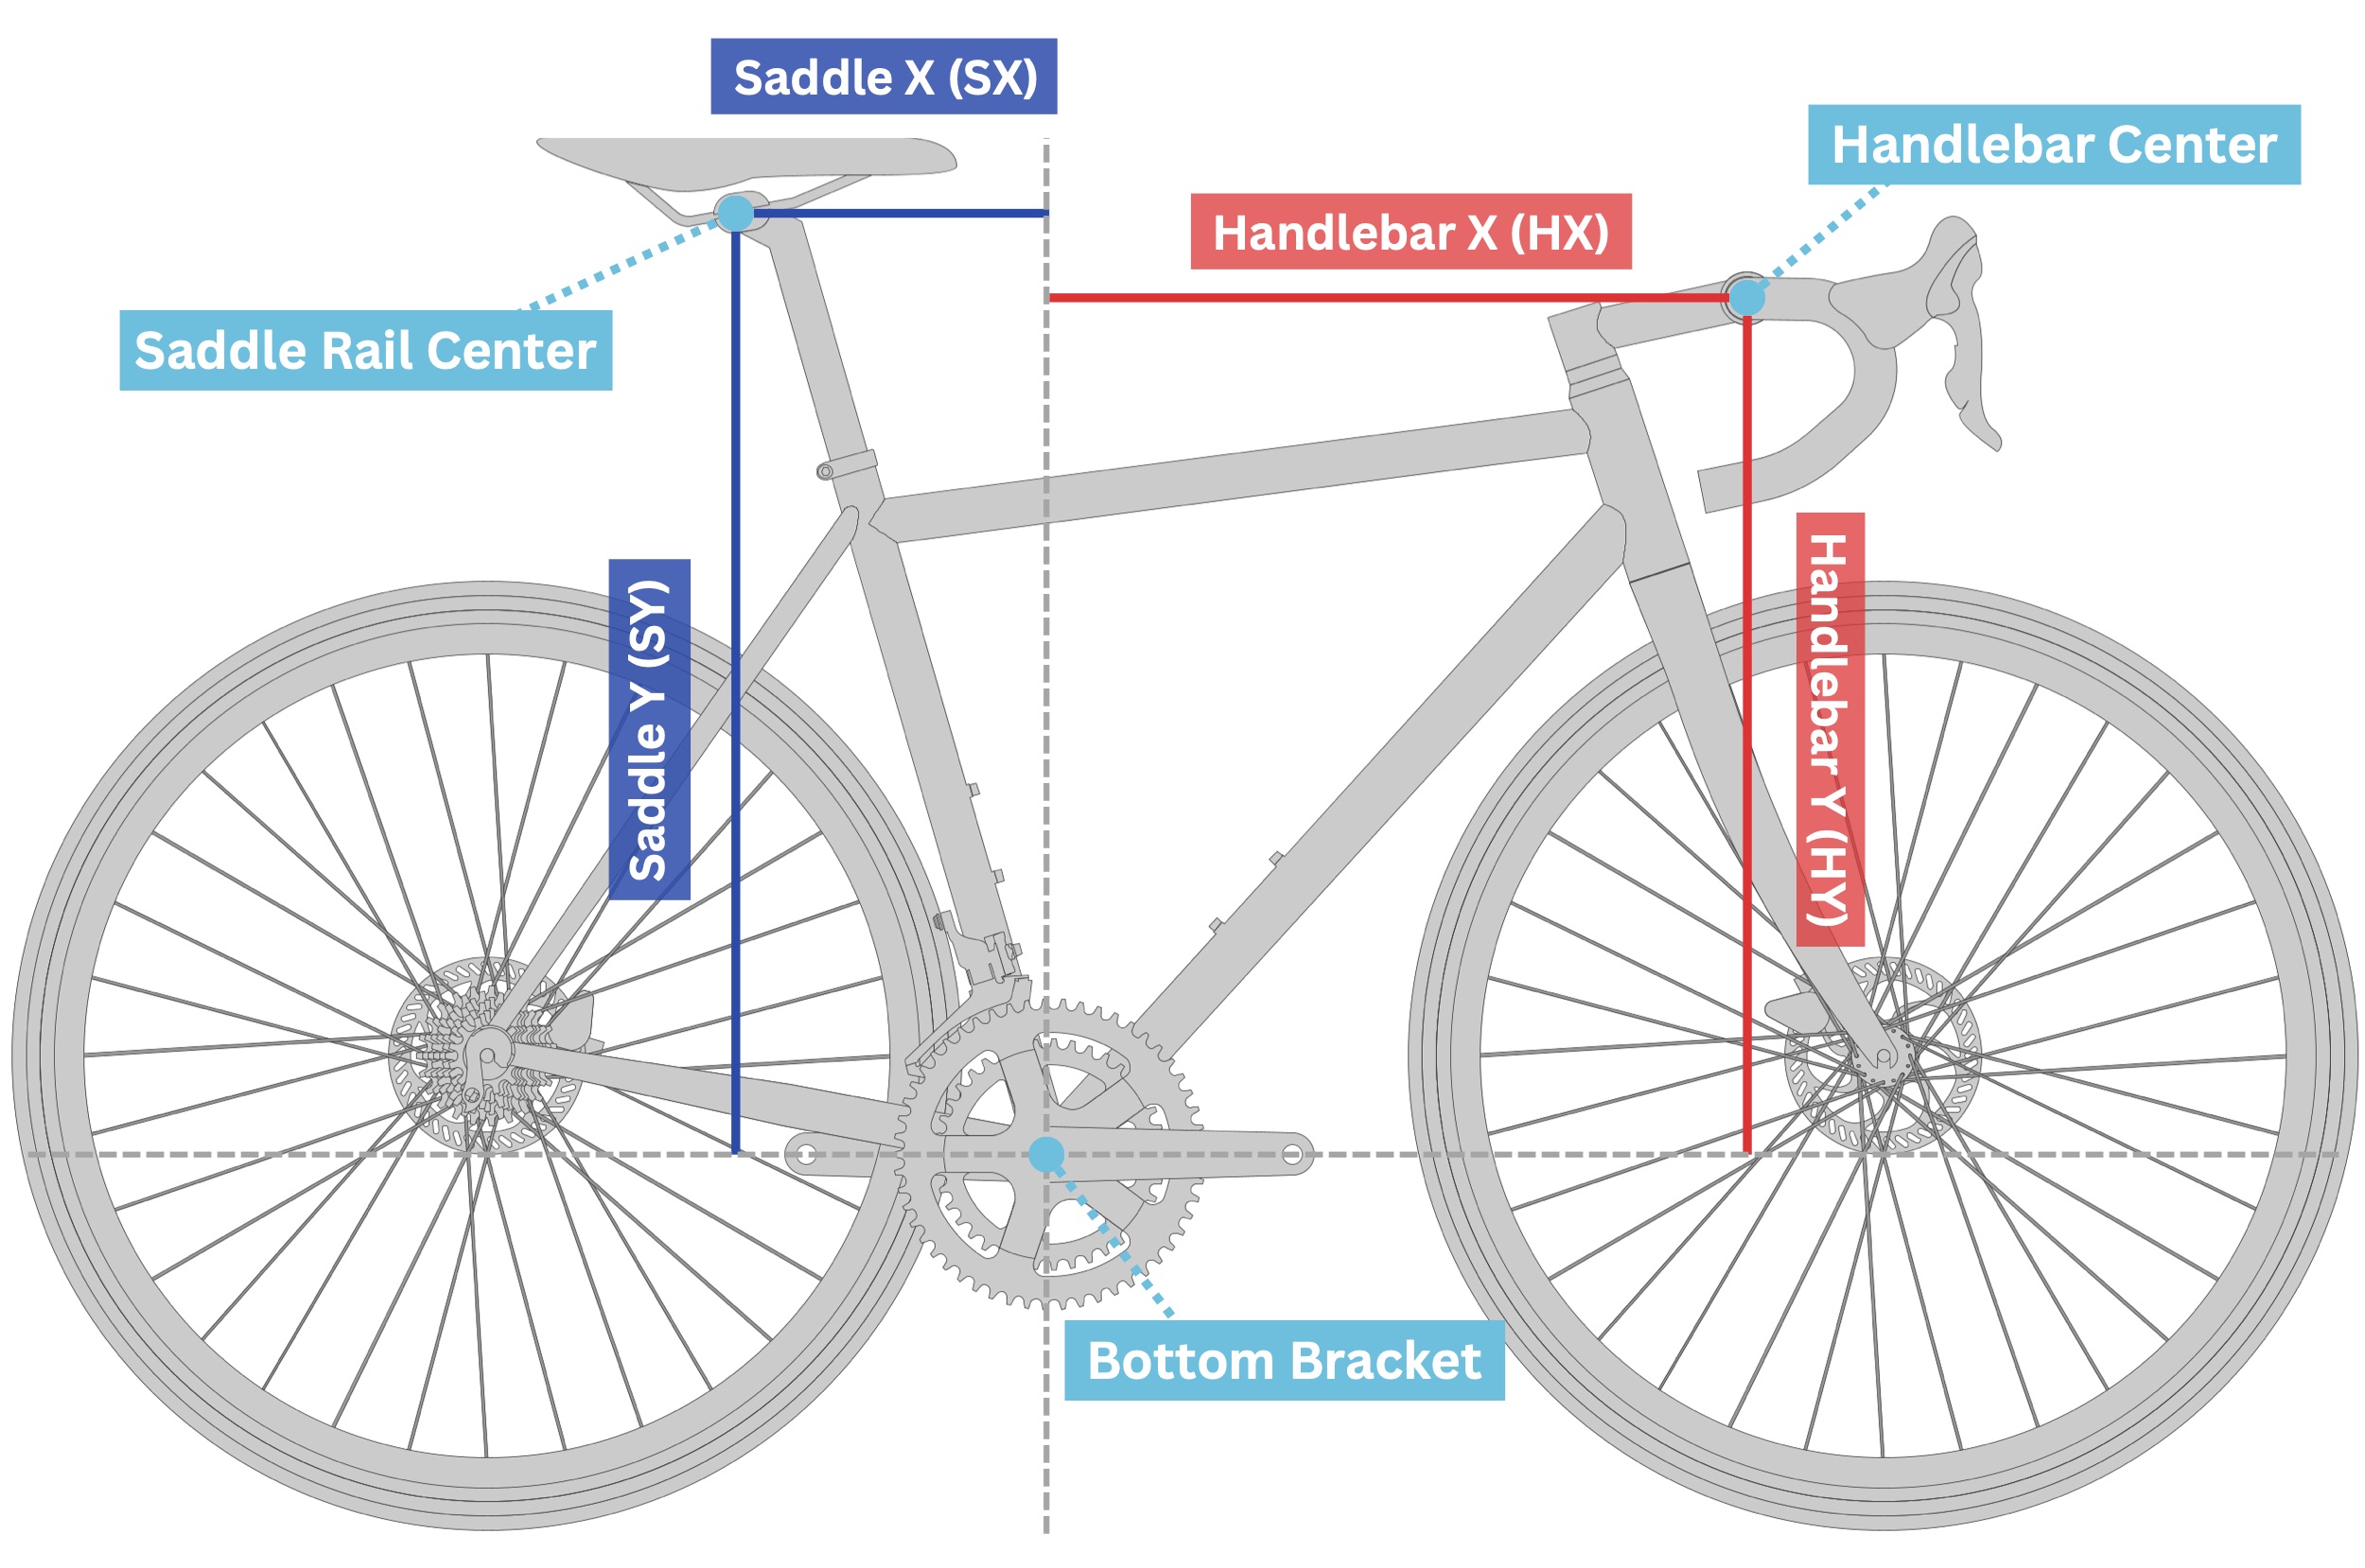
As shown in the diagram above:
- Saddle X (SX) - The horizontal distance from the bottom bracket to the saddle rail center
- Saddle Y (SY) - The vertical height from the bottom bracket to the saddle rail center
- Handlebar X (HX) - The horizontal distance from the bottom bracket to the handlebar center
- Handlebar Y (HY) - The vertical height from the bottom bracket to the handlebar center
Why measure to the Saddle Rail Center (SRC)?
Understanding the location of the SRC allows us to precisely calculate whether a straight or setback seatpost might be required with a particular saddle, or if certain integrated seat masts (ISMs) will work or not.
More traditional measurements such as "Saddle setback to BB", "BB to top of saddle height", or "80mm width point to BB" are still valuable data points when logging bike measurements, but they do not provide sufficient data to be able to prescribe the information noted above.
Target Positions
Target positions are the known or desired X and Y coordinates for your saddle and handlebar positions. These values can come from:
Fit Bike Measurements
If you've had a professional bike fit on a fit bike (like a Retül, Guru, Purely Custom, etc), the fitter would have determined your optimal saddle and handlebar positions. These X and Y coordinates represent your ideal position.
Current Bike Measurements
If you're happy with your current bike position, you can measure the X and Y coordinates of your saddle and handlebar positions. This allows you to find a new bike that can match and achieve your current riding position. A crosshair laser level pointed squarely through the BB is the best way to measure this, but there are other means to measure these points as well.
By entering these target positions into the "Rider Information" section of the calculator (Pro subscription required), you can evaluate how closely different bikes will match your preferred position.
Understanding the Results
The calculator produces several important results that help you evaluate the bike position.
Position Differences
When the calculator displays the handlebar X and Y positions, it also shows the difference between the calculated position and your target position:
- → 5mm longer means the handlebar X position is 5mm further forward than your target
- ← 3mm shorter means the handlebar X position is 3mm closer than your target
- ↑ 8mm higher means the handlebar Y position is 8mm higher than your target
- ↓ 2mm lower means the handlebar Y position is 2mm lower than your target
These differences help you understand how closely the bike geometry + stem/handlebar configuration matches your target position. The color coding (red and blue) provides a quick visual reference—the same colors are used in the calculator itself.
Bar Reach Needed
The "Bar Reach Needed" value accounts for small differences between the calculated Handlebar X position and your Target Handlebar X. It suggests how much handlebar reach you would need to achieve your exact target X position.
For example, if your calculated Handlebar X is 5mm shorter than your target, a handlebar with 5mm more reach would help you achieve your exact target position.
Setback vs STA
"Setback vs STA" indicates how far back (or forward) the saddle rail center would be positioned on a straight/zero setback seatpost:
- Negative values (e.g., -24mm) indicate the saddle is set back behind the seat tube angle line
- Positive values (e.g., +5mm) indicate the saddle is set forward ahead of the seat tube angle line
This measurement helps you determine what type of seatpost you'll need:
- Large negative values suggest you may require a setback seatpost
- Positive values or small negative values might work better with a zero-offset or forward seatpost
BB to Rail
The "BB to Rail" value is particularly useful for bikes with integrated seat masts or specific seatpost designs (like Trek or Giant ISMs). It measures the distance from the bottom bracket to the saddle rail along the seat tube axis, which may vary based on the angle of the saddle rail when installed.
This value helps determine:
- Whether a position can fit within a size's minimum-maximum range for a specific seat mast system
- The appropriate seat mast cap or seatpost length needed
- How much adjustment range you have available
Practical Usage Tips
Here are some practical tips for getting the most out of the X/Y Position Calculator:
Comparing Multiple Bikes
The calculator allows you to add multiple bikes for side-by-side comparison (Basic or Pro subscription required). This makes it easy to see which bike comes closest to achieving your target position with the least modification.
Exploring Stem Options
You can adjust stem length, angle, spacer height, and headset cover height to see how these changes affect the handlebar position. This helps you find the optimal stem configuration for each bike.
Note on Stem Height
"Stem Height" refers to the height of the stem clamp on the steerer tube. This measurement typically ranges from 38-42mm on traditional stems.
With the advent of internal cable routing systems, some modern stems (like the FSA NS ACR stem) have a very short clamp section at the steerer tube and non-traditional shapes. For these stems, the calculator's results may be off by a few millimeters since they may not follow conventional stem geometry.
If you're working with a bike that uses an integrated cockpit or non-traditional stem, be aware that small variations in the calculations might occur.
Note on Spacer & Headset Height
With the addition of the "Headset Height" input (ver 1.6), the spacer height is now calculated using only the actual spacers above the headset and below the stem. Headset Height can be used for headset bearing covers and transition spacers for integrated systems.
It's important to know that some instances, brands incorporate the headset bearing cover and/or transition spacers into their published stack and reach numbers. While this is generally rare, it's becoming more prevalent with modern "super bikes" with fully integrated front ends and proprietary parts.
When in doubt, check the manufacturer's geometry chart notes or contact them directly to confirm how spacer heights should be measured for a particular model. Also be sure to double check actual measurements of the bike itself before committing to cutting the steerer tube.
Saving Your Data
Once you've created a setup that works, use the Save button to store your configuration to the cloud for future reference.Pro subscription required
Printing Results
The Print button generates a professional, easy to read PDF of your bike comparisons, making it simple to share with clients or keep in your records for future reference. Pro subscription required